Showing posts with label picavet. Show all posts

Thursday, January 31, 2013

Blow-back and pre-angle


The picavet system does a good job of keeping the camera level, except for light rigs in strong wind. Light rigs can suffer from blow-back where the wind blows the rig back away from the vertical.

You can see how the camera is angled compared to the horizon in the left photo, which would result in many unusable tilted shots. The effect is greater up higher in strong wind and when the camera is side-on.

The right photo shows the camera pre-angled to counteract the blow-back effect resulting in a higher number of level shots.

This is only possible with a rig that allows the camera to rotate from landscape to portrait orientation.

400g Aurico pan rig in Bft 5 (18kn). 

The picavet cross on my basic GoPro rig has extra mount hole positions allowing the camera to be mounted off centre for the same reason.


Black Lighthouse and Fort Queenscliff

Tuesday, January 15, 2013

KAP extra bits

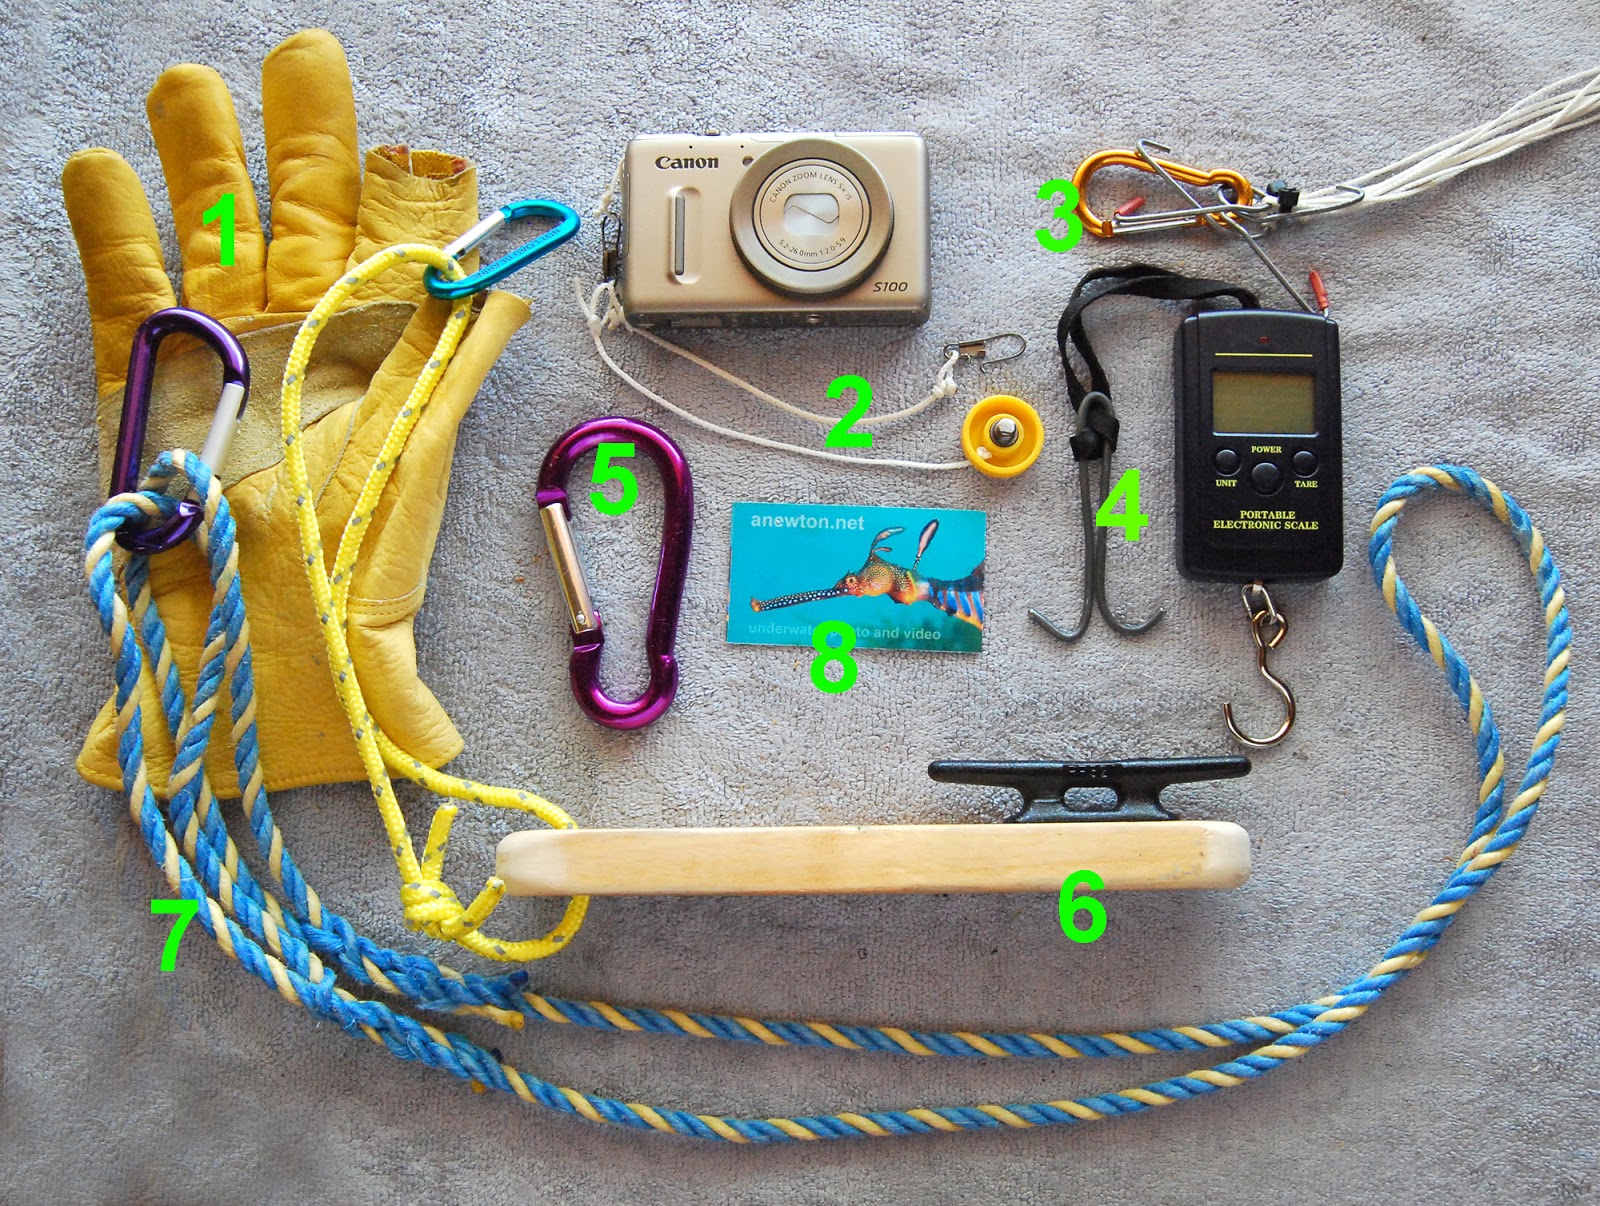
These are the peripherals I regularly use to make serious kite flying safer, easier and more enjoyable.

1. Leather gloves for the dominant hand with pointer finger and thumb tips cut off.
The kites we use produce strong pull on the line. With that comes the very real risk of cuts and burns from fast moving line. Gloves are essential, no question.

2. Lanyards for the camera and mounting bolt.
I connect the camera tether to the picavet lines, that way if any part of the rig fails the camera won't plummet to earth but dangle from the lines. A forgotten mounting bolt would be the most common reason for an unsuccessful KAP outing.

3. Carabiner to store the picavet lines.
These line hooks are like grappling anchors and with the picavet lines will very easily twist and tangle. The picavet lines are wrapped in a figure of eight around the picavet cross after connecting the line hooks as shown.

4. Luggage scale with gamma hook to measure line pull.
This gives me an idea of which camera rig is suitable for the kite and wind strength.

5. Big carabiner to walk the kite down.
Sometimes when there is enough space you can walk the kite down by clipping this big carabiner to the kite line and walking towards the kite.

6. Kite cleat for securing the kite line when using the skate wheel reel.
Also called a Henry's handle I think. A few figure of eight wraps of line around the cleat will hold the kite. I can either clip the kite cleat to my backpack, which I always wear, or to a tree or post using the longer loop.

7. Longer loop of rope with carabiner to tie off the kite cleat or strato spools.
This is long enough to wrap round something solid like a tree, rock or car tow ball.

8. Website card.
Because people will be drawn to you while flying big kites with "what is that" dangling from the line, and it's good to be able to direct them to your website to share the results.

Friday, December 21, 2012

Proportional pan servo

A more logical method for pan is to use a larger gear on an unaltered servo with a smaller gear on the pan bolt. With the correct ratio (5:2 in my case) you can achieve +/- 180º rotation (=360º)  from a +/- 45º servo.

Also by changing the transmitter pan lever for a rotating pot or variable resistor (more about that later) you can make the rig pan position match the transmitter pan knob position.

This means you always know which direction the camera is pointing by looking at the transmitter pan knob.

A note of caution. Small movements of the pan knob give large movements of the rig. You need to be prepared for a sudden rotation of the rig when it is turned on. It's a good idea to turn it on to align the rig before hanging from the kite line and with no tension on the picavet. This way the picavet will spin on start up rather than the rig.

Friday, December 14, 2012

KAP rigs - Manual

Over the next few posts I'll explain 3 different types of KAP rig starting with the most basic manual rig.

The camera mounts onto a simple tilt/pan bracket, which must be pointed in the right direction before launching. Photos are captured continuously using the intervalometer or timelapse function.

 Canon Powershot S100 manual rig - 300g (including camera, rig, picavet and lines)

The S100 is not supplied with it's own intervalometer so the CHDK firmware tweak is necessary. The mounting bracket is 20mm x 1.6mm aluminium.

Camera and rig need to be balanced for the rig to hang perfectly level. Positioning of the tripod mount hole, picavet bolt hole and tilt axis are important.  Here's a page explaining how to find the centre of gravity written by James Gentles, a very clever KAP electronics inventor.

Manual rigs are the simplest and lightest setup allowing KAP in light winds and with the least stress. Great for targeting a specific subject but pre-flight aiming needs to be accurate. The camera must be retrieved to make orientation changes.
This is my favourite rig, very light and simple. In a steady 5kn+ wind the Levi Delta will lift it with hardly any pull on the line. I can walk around to position the camera where I want it and easily wind in or let out line.

GoPro HD2 manual rig - 260g

The GoPro with a tripod adapter bolts directly to the picavet upside down and images are inverted via GoPro menu selection. More than one mounting hole on this picavet allows the rig to be levelled for different camera tilt positions.
This is my lightest rig weighing 260g, used for flying from a dive boat and in light or unreliable winds. The camera is tough and well protected in its waterproof housing and has a fisheye lens. I tend to crop and "defish" the images in Photoshop for a more realistic result.

This rig could be made lighter still by removing the filter holder, but it is needed to hold a flat filter to allow underwater focus.

Thursday, December 13, 2012

Hang the camera - Picavet


Usually the camera doesn't attach directly to the kite but hangs 20m or more lower down the line on a picavet self levelling system, named after french inventor Pierre Picavet. This keeps the camera steadier while the kite moves around. The picavet is a cross with 4 pulleys or holes through which 4 lines pass. The 4 lines are gathered at each end and attached to 2 line hooks which hang from the kite line. This allows the line angle to change while the camera stays level.
Here's an animated demo of how it all works from the Kaper website.

This picture shows my line hook bent up from thin coat hanger wire.

Ready made line hooks and picavet kits are available from The KAP Shop

The top 2 picavets are made from UPVC plastic, cut and heat moulded to shape. The bottom one is from the KAP shop. The picavet can be used with or without pulleys but they make the action smoother and quicker to level. I used Ronstan Kite Blocks costing about A$8 for a pack of 2.
More expensive and lighter Pekabe model boat blocks are another option.


Weight is always a consideration when building KAP rigs. A lighter rig can be used in a wider wind range and with less pull on the line.

My 4 picavet lines are each about 1.8m long, which allows the camera to hang about 90cm below the kite line with the 2 line hooks about 1.2m apart. The suspended ring prevents rotation.

Some KAPers use one length of continuous line to thread the picavet. Either way works well.

This photo shows one of my rigs hanging from the line of a PL 2m2 Pilot