The biggest problem with Kite Aerial Photography is that the camera is moving all the time, sometimes to a scary degree. More than once I have seen the camera do the full 360 over the kite line.
So you must use a fast shutter speed. I use shutter priority and routinely set it on 1/2000th. That's Tv on Canon and S mode on Nikon. In light and steady winds you could use a slower shutter speed.
With the Canon S100 I also choose Auto ISO to prevent underexposure on dull days. With the Nikon I use ISO200 because Auto ISO is not available in S mode.
In shutter priority mode the camera chooses the aperture for correct exposure. With the shutter set at 1/2000th the aperture will most likely be wide open. This is OK because the subject is usually far away so depth of field is not an issue. Even with wide apertures, like f/2, everything will be in focus.
I'm undecided about Image stabilisation at this stage having tried with and without but not seen any difference.
I have the intervalometers set at one shot every 5 seconds on all three cameras.
Showing posts with label intervalometer. Show all posts
Showing posts with label intervalometer. Show all posts
Sunday, February 3, 2013

Saturday, January 12, 2013
Nikon D80 AuRiCo rig
Once I knew my kites could lift the SLR it was time to add some AuRiCo.
 This rig was to be another limited pan, manual tilt style, which involved some very simple shed tinkering.
Just had to bend up some aluminium as a pan bolt bracket and rivet it on to the top U. This bracket steadies the pan bolt which is no longer solidly fixed to the top U but rotates.
The bracket also acts as the pan servo mount so I had to think about how far away from the pan bolt the servo needed to be positioned. That distance depends on the thickness of the servo and which gear cogs are used.
Nikon D80 SLR AuRiCo autoKAP rig - 1195g
To keep the rig as simple and light as possible I used velcro and rubber bands to hold the AuRiCo and batteries on.
As the pan servo is only rotating the rig it doesn't need to be too big or securely bolted on. I started with a Futaba S3003 but ended up using Turnigy 380MG stuck on with double sided tape and cable ties. Although the servo is moving over 1kg of camera and rig there is a lot of give in the picavet suspension setup.
You can see in this video how the load transfer from servo to rig is quite spongey which reduces strain on the servo. The servo moves the picavet on its lines first then the rig swings around.
Nikon D80 KAP shots
 This rig was to be another limited pan, manual tilt style, which involved some very simple shed tinkering.
Just had to bend up some aluminium as a pan bolt bracket and rivet it on to the top U. This bracket steadies the pan bolt which is no longer solidly fixed to the top U but rotates.
The bracket also acts as the pan servo mount so I had to think about how far away from the pan bolt the servo needed to be positioned. That distance depends on the thickness of the servo and which gear cogs are used.
Nikon D80 SLR AuRiCo autoKAP rig - 1195g
To keep the rig as simple and light as possible I used velcro and rubber bands to hold the AuRiCo and batteries on.
You can see in this video how the load transfer from servo to rig is quite spongey which reduces strain on the servo. The servo moves the picavet on its lines first then the rig swings around.
Nikon D80 KAP shots
Thursday, January 10, 2013
Nikon D80 SLR manual rig
I recently upgraded to a Nikon D7000 for underwater photography so my original SLR, a Nikon D80, doesn't get much use these days. To reward the D80 for reliable long service and paying for itself many times over I thought it might like to go flying.
It's not the ideal KAP camera being quite heavy (672g body + 202g 18-55mm lens = 874g all up)
and it doesn't have an intervalometer but that didn't stop me. James Gentles makes a lovely little device called GentLED-AUTO which is an IR remote intervalometer weighing just 20g. I just happened to have one sitting around so it was time to give SLR KAP a try.
First step was to make a basic manual rig just to see if my kites could lift it.
I bent up some aluminium to make a rig similar to the vertical style Aurico autoKAP rig for the Canon S100. But this design, a single vertical support with an L bracket to mount the camera, was way too flexible for the heavier SLR. The spring like flexing would have had the camera bouncing up and down continuously.
 Nikon D80 manual rig - 1090g
So I had to revert to the tried and tested double U style. This allows a light and stiff rig to be built using the minimum of material, but it means I needed to balance the camera in the bottom tray carefully following James Gentles guide, which I find much trickier than building the vertical style rig.
The bottom U tray needs to be wide enough, front to back, to accommodate the camera mounting bolt and the pivot holes on each side which are at the centre of gravity for the camera. With this camera/lens combo the centre of gravity is 24mm forward of the camera mount hole. The bottom U needed to be 40mm wide. The top U only needed to be 30mm wide to be stiff enough.
Amazingly the wind was perfect for a test fly on the day I made this rig. Sunny with a smooth onshore 12kn and the Levitation Delta had no problem lifting it all as shown in this video.
I was really pleased with the image quality compared to the Canon S100 partly because the heavier rig isn't blown around by the wind as much.
I have begun to realise that lighter rigs suffer from blow back resulting in angled horizons or more/less tilt than expected. I'll talk more about blow back soon.
Here are KAP shots using the D80
It's not the ideal KAP camera being quite heavy (672g body + 202g 18-55mm lens = 874g all up)
and it doesn't have an intervalometer but that didn't stop me. James Gentles makes a lovely little device called GentLED-AUTO which is an IR remote intervalometer weighing just 20g. I just happened to have one sitting around so it was time to give SLR KAP a try.
First step was to make a basic manual rig just to see if my kites could lift it.
I bent up some aluminium to make a rig similar to the vertical style Aurico autoKAP rig for the Canon S100. But this design, a single vertical support with an L bracket to mount the camera, was way too flexible for the heavier SLR. The spring like flexing would have had the camera bouncing up and down continuously.
 Nikon D80 manual rig - 1090g
So I had to revert to the tried and tested double U style. This allows a light and stiff rig to be built using the minimum of material, but it means I needed to balance the camera in the bottom tray carefully following James Gentles guide, which I find much trickier than building the vertical style rig.
The bottom U tray needs to be wide enough, front to back, to accommodate the camera mounting bolt and the pivot holes on each side which are at the centre of gravity for the camera. With this camera/lens combo the centre of gravity is 24mm forward of the camera mount hole. The bottom U needed to be 40mm wide. The top U only needed to be 30mm wide to be stiff enough.
Amazingly the wind was perfect for a test fly on the day I made this rig. Sunny with a smooth onshore 12kn and the Levitation Delta had no problem lifting it all as shown in this video.
I was really pleased with the image quality compared to the Canon S100 partly because the heavier rig isn't blown around by the wind as much.
I have begun to realise that lighter rigs suffer from blow back resulting in angled horizons or more/less tilt than expected. I'll talk more about blow back soon.
Here are KAP shots using the D80
Thursday, January 3, 2013
SDM - Stereo Data Maker
SDM is a version of CHDK (Canon Hackers Development Kit) designed specifically for syncing 2 or more Canon compact cameras for 3D photography. It also simplifies CHDK for single cameras and Kite Aerial Photography.
In a nutshell, it means a lot of the irrelevant CHDK stuff is gone leaving a much cleaner menu.
Just like CHDK you need to establish your firmware version, download the correct build, copy it onto a freshly formatted SD card, lock the card and you're in business.
Development of SDM seems to lag behind CHDK, probably because developers like David Sykes, another very clever KAPer - see this KAP forum post, need to get a hold of two identical cameras to test syncing function. It's not officially available for the Canon S100 yet but beta versions are easily obtainable. Ask nicely on the KAP forum.
Dave Mitchell's ACID and SDMinst apps are very helpful once again to get it all running.
UPDATE: and his new STICK and ASSIST apps are even easier to use.
The value of SDM and CHDK is the ability to run scripts. These are simple programs written in uBasic language. There are plenty of scripts pre-loaded with CHDK/SDM or you can download more from the KAP forum or CHDK/SDM websites.
uBasic is a very simple and easy to read language that can be edited in any text editing app like Notepad or TextEdit. I used TextWrangler on the Mac. The scripts must be saved as simple text files with the file extension .bas
WindWatcher and HQasem have shared some fancy scripts on the KAP forum.
My basic intervalometer script looks like this:
@title APN intervalometer
@param t interval(sec)
@default t 5
rem single camera, display off
sleep_for 1000
sync_off
turn_backlight_off
sleep_for 1000
rem endless loop with delay
while 1
shoot
sleep_for_seconds t
wend
end
Here's how SDM appears on the Canon S100 screen:


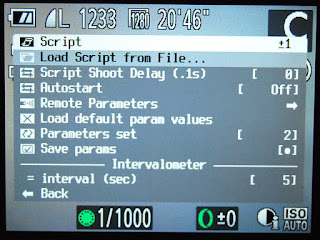
 Here's the Scripting screen where you can load a different script or change current script parameters

In a nutshell, it means a lot of the irrelevant CHDK stuff is gone leaving a much cleaner menu.
Just like CHDK you need to establish your firmware version, download the correct build, copy it onto a freshly formatted SD card, lock the card and you're in business.
Development of SDM seems to lag behind CHDK, probably because developers like David Sykes, another very clever KAPer - see this KAP forum post, need to get a hold of two identical cameras to test syncing function. It's not officially available for the Canon S100 yet but beta versions are easily obtainable. Ask nicely on the KAP forum.
Dave Mitchell's ACID and SDMinst apps are very helpful once again to get it all running.
UPDATE: and his new STICK and ASSIST apps are even easier to use.
The value of SDM and CHDK is the ability to run scripts. These are simple programs written in uBasic language. There are plenty of scripts pre-loaded with CHDK/SDM or you can download more from the KAP forum or CHDK/SDM websites.
uBasic is a very simple and easy to read language that can be edited in any text editing app like Notepad or TextEdit. I used TextWrangler on the Mac. The scripts must be saved as simple text files with the file extension .bas
WindWatcher and HQasem have shared some fancy scripts on the KAP forum.
My basic intervalometer script looks like this:
@title APN intervalometer
@param t interval(sec)
@default t 5
rem single camera, display off
sleep_for 1000
sync_off
turn_backlight_off
sleep_for 1000
rem endless loop with delay
while 1
shoot
sleep_for_seconds t
wend
end
If you want to use it copy the text, paste it into a text editor then save it as APNintvl.bas or whatever you want. Feel free to edit and personalise it to your own needs.
Copy the .bas file into the SCRIPT folder in the CHDK folder on your SD card and it will appear as a choice in the list of scripts.
Here's how SDM appears on the Canon S100 screen:

Splash screen on startup. Wait for it to go before pushing any buttons.

Push the Review or Play button to enter <ALT> mode.
Currently selected script (APN intervalometer) is displayed along the bottom left.

In <ALT> mode push MENU to bring up the SDM Basic menu


This is my intervalometer script set to shoot every 5 seconds. This script also blanks the screen while shooting which prolongs battery life.
Sunday, December 23, 2012
CHDK overview
OK, take a deep breath and buckle in. It's time to delve into the shadowy world of CHDK or the Canon Hackers Development Kit.
I am a CHDK novice but I find it quite thrilling and subversive.
CHDK means different things for different users, but for me it means I can make my Canon S100 automatically shoot at set intervals by running an intervalometer script. I have mine set at one shot every 5 seconds. Perfect for KAP.
CHDK is a firmware hack that is loaded onto your SD card and over-rides the cameras firmware when it is turned on. It doesn't change the firmware permanently, just while that particular SD card is used and the camera is on.
The correct version or "Build" of CHDK must be downloaded from the CHDK website for your particular cameras firmware. Mine is S100-101b. They are not interchangeable.
Once CHDK is running on your camera you will see extra icons on the LCD. They can be quite ugly and obtrusive but the extra functions given to the camera make it worth while.
Initially it was conceived to give DSLR-like functions (RAW, live histogram, exposure bracketing) to compact cameras but it also allows scripts or mini programs to be run. The intervalometer script is the main reason I use CHDK.


I am a CHDK novice but I find it quite thrilling and subversive.
CHDK means different things for different users, but for me it means I can make my Canon S100 automatically shoot at set intervals by running an intervalometer script. I have mine set at one shot every 5 seconds. Perfect for KAP.
CHDK is a firmware hack that is loaded onto your SD card and over-rides the cameras firmware when it is turned on. It doesn't change the firmware permanently, just while that particular SD card is used and the camera is on.
The correct version or "Build" of CHDK must be downloaded from the CHDK website for your particular cameras firmware. Mine is S100-101b. They are not interchangeable.
Once CHDK is running on your camera you will see extra icons on the LCD. They can be quite ugly and obtrusive but the extra functions given to the camera make it worth while.
Initially it was conceived to give DSLR-like functions (RAW, live histogram, exposure bracketing) to compact cameras but it also allows scripts or mini programs to be run. The intervalometer script is the main reason I use CHDK.
The images below show how the camera screen changes when CHDK is loaded.

Here's my default Canon S100 screen and the normal Canon Menu

The SD card needs to be locked for CHDK to load up when the camera is turned on. This seems odd but that's how it works. With an unlocked card the camera just operates normally.

When CHDK is loaded correctly the splash screen appears first then the S100 screen appears with extra icons overlaid. It is possible move and hide the icons if you want but don't worry about that just yet.

To get to the CHDK menus you push the review button to change to <ALT> mode, then push the MENU button.

This is the Scripting Parameters screen where you choose a script. e.g. Intervalometer, and enter details like the interval e.g. 5 seconds
Now, as long as you are in <ALT> mode the Intervalometer will start when you push the shutter button and stop with another push.
Here's a video demo of CHDK.
That's it really. In the next post I'll cover how to find the correct build, download and copy to the SD card.
Friday, December 14, 2012
KAP rigs - Manual
The camera mounts onto a simple tilt/pan bracket, which must be pointed in the right direction before launching. Photos are captured continuously using the intervalometer or timelapse function.
 Canon Powershot S100 manual rig - 300g (including camera, rig, picavet and lines)
The S100 is not supplied with it's own intervalometer so the CHDK firmware tweak is necessary. The mounting bracket is 20mm x 1.6mm aluminium.
Camera and rig need to be balanced for the rig to hang perfectly level. Positioning of the tripod mount hole, picavet bolt hole and tilt axis are important. Here's a page explaining how to find the centre of gravity written by James Gentles, a very clever KAP electronics inventor.
Manual rigs are the simplest and lightest setup allowing KAP in light winds and with the least stress. Great for targeting a specific subject but pre-flight aiming needs to be accurate. The camera must be retrieved to make orientation changes.
This is my favourite rig, very light and simple. In a steady 5kn+ wind the Levi Delta will lift it with hardly any pull on the line. I can walk around to position the camera where I want it and easily wind in or let out line.
 GoPro HD2 manual rig - 260g
The GoPro with a tripod adapter bolts directly to the picavet upside down and images are inverted via GoPro menu selection. More than one mounting hole on this picavet allows the rig to be levelled for different camera tilt positions.
This is my lightest rig weighing 260g, used for flying from a dive boat and in light or unreliable winds. The camera is tough and well protected in its waterproof housing and has a fisheye lens. I tend to crop and "defish" the images in Photoshop for a more realistic result.
This rig could be made lighter still by removing the filter holder, but it is needed to hold a flat filter to allow underwater focus.
Subscribe to:
Posts (Atom)